The Price Action trading strategy: Trading the trend
1 - Bar types
Upward bars: each high and low is higher than the previous ones. The bars indicate that we are witnessing an uptrend. You'll notice that the closing price is higher than the opening price until the trend reverses and the closing price is now below the open.
Downward bars: each high and low is lower than the previous ones. The bars indicate that we are witnessing an downtrend. You'll notice that the closing price is lower than the opening price until the trend reverses and the closing price is now above the open.
Inside bar: also known as a narrow range bar; this is a bar where the high is lower than the the one in the previous bar and the low is higher. An inside bar is usually a sign of market indecision.
Outside bar: also known as a wide range bar or an engulfing bar; this is a bar where the high is higher than the the one in the previous bar and the low is also lower. When the opening price is in the upper half of the bar and the closing price is in the bottom half, it is a bearish engulfing bar. When the opening price is in the lower half of the bar and the closing price is in the upper half, it is a bullish engulfing bar.
There is another way of defining this type of bar, especially with candlestick charts. An outside bar can be when the opening price and the closing price have engulfed the open and close of the previous bar, and not just the bar's high and low. Using this definition, the engulfing of the bar does not need to have a high or a low to be an outside bar. The first definition probably saw the light from the use of bar charts, where it is harder for the eye to spot opening and closing prices.

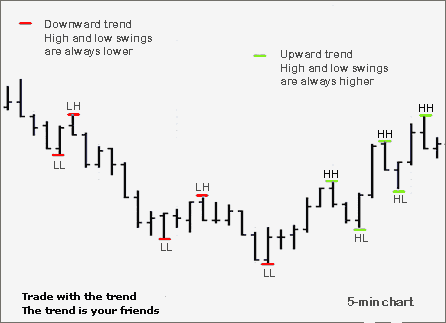
2 - The trend on a 5-min. chart
The following illustration shows high and low swings in both trend directions: bullish and bearish. The price in a given period is moving in an uptrend if its highs are always higher (HH = higher high) and its lows are always higher (HL = higher low). Prices are in a downtrend if its highs are always lower (LH = lower high) and its lows are always lower (LL = lower low). If prices move in a horizontal manner, it's in consolidation mode (a choppy market), ranging or forming triangles, pennants, rectangles, etc...
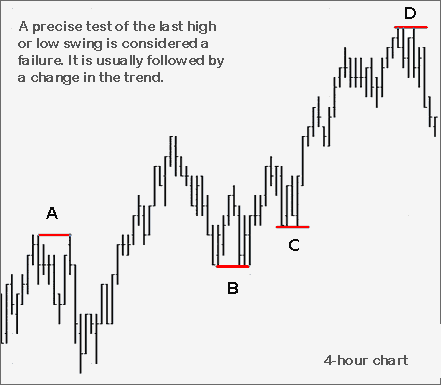
3 - A change in the trend
The below diagram shows how a genuine test of a high or a low can often forbode a change in the overall trend.
(A) Price made a HH and a HL and then comes test the previous swing high a 2nd time at A.
(B) Price hits a LL and a LH before coming to test the previous swing low at B a 2nd time.
(C) The price hits a LH (the bar which doesn't touch line C) and then it comes test the previous swing low at C.
(D) Price made a HH and a HL before coming to test the previous swing high at D a 2nd time.
4 - The trend within the trend
When observing a single currency pair, it is possible to see different trends or a period of consolidation when you switch between different timeframes. For example, a daily chart shows a downtrend while the H4 chart shows a retracement or a correction. How does this affect your trading? The following example is an excellent way to understand what is meant by the expression "trend within the trend".
Take a 15-minute chart and mark the new highs (HH), and the new higher lows (HL), the new lower lows (LL) and the lower highs (LH). You can print the chart and mark it up by hand. Use red lines for downward trends and green lines for upward trends. Remember that prices are in an uptrend if they make HH and HL and they're in a downtrend if they hit LH and LL. If prices are doing otherwise, they may be consolidating, ranging, forming triangles, pennants, rectangles, etc.
1-4 are within a downward trend.
5-8 are within an upward trend.

Take the same chart, but this time with a 5-minute timeframe, keep the same colored marks and numbers as you had in the 15-minute chart. Mark the new highs and lows with green numbers for the upward trends and red numbers for the downward trends.

We can now spot a trend in the 15-minute diagram with the HH/LL marks and, at the same time, we can also identify a trend on the 5-minute chart with the coloured numbers. The price action in the 15-minute diagram only shows 2 trends, while the 5-minute chart shows 5 different trends!
At first, both charts are in a downtrend until the 5-minute chart shows a new HH at the first green number 1. The bearish trend was interrupted when the LH at the black number 3 was passed through. The price then made a new HL (green 2) indicating the beginning of a bullish trend that continues up to the new LH (red 1).
In the 15-minute chart, we just made a HH at the black 5; here, we must wait until a HL forms in order to make a purchase order in the 5-minute diagram. 2 strategies are possible: buy after the pair of reversal bars at the red 2 or wait until the last swing high at red number 1 is passed through (buy here). The stop will be placed under the last HL and pulled up every time a new HL is made in order to follow the trend. It is nevertheless recommended that you take half of your profits while following the trend and that you exit your last position with a stop order.
On the climb up to the HH at the black 7, both timeframes are in agreement. Afterwards, though, the 5-minute chart shifts to a bearish trend (red numbers 1 to 6) while the 15-minute diagram is still considered as being in an uptrend, achieving a HL at the black 8.
Although it is possible to trade trends using small timeframes, you must wait for price action to demonstrate the same trend in a higher timeframe in order to more effectively trade the trend.
The trend is your best friend!
